As always, if you are not familiar with home canning, please see the National Center for Home Food Preservation. This recipe does not substitute for a complete set of instructions
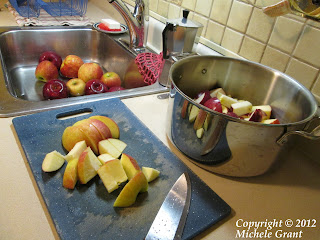
We're going for a full canner load of 7 pints. First, carefully wash and then coarsely chop about 8 pounds of apples . . .
 |
| Do not peel or core: toss everything into the pot |
Keep your knife sharp. After a few apples, you may lose the edge on your knife. If it slips instead of cuts, then you'll be making finger butter.
 |
| Oh, we're only about a third done here |
Hard to see here, but we're still tossing in the peels, seeds, and stems. When the pot is full, add 2 to 4 cups of water and cook on medium-high until the apples are soft. Stir frequently. The cooking time will vary based on what variety of apple you choose and how finely you chopped the fruit. When the apples are soft, pass them through a food mill:
 |
| It doesn't look like a chore . . . yet |
I'm not sure why a lot of recipes tell you to peel and core the apples and then also pass them through a food mill later on. The food mill can do all that work for you. It could be that the seeds impart some bitterness to the final product, but personally I can't detect any off flavors with my method. So why do the work twice?
I have set my food mill here over a medium saucepan. As the pan fills up, I dump the apple purée into a large mixing bowl and clear out the peels and cores from the mill and toss them. Two hints here. One, some varieties of apple will sauce up better than others; check an online resource, dig something from your local university extension, or ask your fruit purveyor, whether farmers market or supermarket. You want an apple that will disintegrate well into sauce, but holds flavor well and isn't too watery. Two, be patient and let the stove do its work! Keep an eye on the apples and stir them as needed, but know that you may have some significant down time while the apples cook. It's a good opportunity to clean the prep tools and set up the canner.
When all the fruit is sauced, place it back into the large pot. Add sugar, from 1/2 cup to 1 cup of sugar per pound of apples, to taste. (For this batch, we used just under 5 cups for about 8 pounds.) Bring the sauce to a simmer, stirring frequently. Watch the temperature of the pot: if it heats too quickly, you may get caramel or even burned sugar on the bottom.
Cook the sauce until it thickens, which will take at least 1 hour and possibly 3 or 4, with a lid loosely placed on top of the pot to hold in some splattering. Do not cover fully. When the sauce has reduced to the right thickness and has darkened considerably, add spices to taste:
 |
| About 1 tablespoon of ground cinnamon, and 1 tablespoon of whole cloves about to meet a certain fate in the grinder |
Stir the spices in thoroughly and cook another 15-30 minutes. Fill jars and process pints for 10 minutes. Let cool overnight, remove screw bands, and clean and label the jars.
 |
| 7 pints plus about 10 extra ounces for the fridge |
And that is about the end of our canning agenda this year. I'm plumb out of pint jars (it's always a challenge to make sure I have enough left by October for apple butter), and my math says I have enough other soft spreads on hand to last me until long into next summer. Maybe I'll do some more quarts of soup stock.

No comments:
Post a Comment