31 October 2012

Home canning: apple butter

Apple butter marks the end of the summer canning season here at Rowhouse Livin'. We've been steadily putting up batches of jam and marmalade since June, but now it's slim pickin's for fruit at the farmers market, and that means it's time for apple butter. Into the kitchen!

As always, if you are not familiar with home canning, please see the National Center for Home Food Preservation. This recipe does not substitute for a complete set of instructionson safe home canning practices.

We're going for a full canner load of 7 pints. First, carefully wash and then coarsely chop about 8 pounds of apples . . .

29 October 2012

Checking in from directly in the path of Hurricane/Nor'easter Sandy

The Rowhouse Livin' household's "default" status is to keep on hand enough food and necessaries for two weeks, a figure I've arrived at after considering factors like the location and construction of our home, the space we have available, and the realistically low possibility that any of our utilities would be out for an extended period. We're a two-person household of a teenager and an adult, and the household's biggest risk is that I'll be unable to leave the house due to an illness (flu, migraine) or injury (sprained ankle). I have ready-to-eat foods on hand, in the form of granola bars, tuna fish, and commercially and home-canned foods, as well as E-Z prep convenience foods, like instant noodle bowls and condensed soups.

Hurricane Sandy has added a wrinkle to our preparedness, though, because the bad news is that the storm is expected to pass almost directly through my neighborhood. It's a little nerve-wracking, because we may actually lose our power for a few days, very different from the super infrequent, super short-term outages we may get in a bad summer thunderstorm or utility accident -- like that one time a transformer blew across the street. A multi-day outage is a very unusual circumstance for us, so I took a few unusual precautions:

  • We spent much of yesterday (Sunday) doing some deep cleaning, including an extra load of laundry, running the dishwasher when it wasn't completely full, and some very eco-unfriendly bleaching in the bathroom. Now we won't run out of underwear; we have plenty of clean dishes; and, well, the bathroom is just more pleasant now that it may be getting about three times its ordinary use this week.

  • Three days ago, I started some sprouts from mung bean seeds. Yesterday, we picked up about seven pounds of apples from the farmers market. Neither the sprouts nor the apples need to be refrigerated, so we're set for the vitamins and fiber we'll need from fresh produce for a while. The first round of sprouts are ready to eat today, but they'll be better tomorrow and Wednesday.

  • Three days ago, I started making extra ice for use if the refrigerator loses power, and for drinking water. Making it on my own over the course of a few days is essentially cost-free, and, frankly, less work than hauling home sacks of ice from the grocery store or beer distributor. In addition, I already keep my freezer lightly packed with used, cleaned water bottles and plastic yogurt tubs re-filled with tap water. Though freezing isn't a big part of my pantry strategy, keeping the freezer packed with ice helps it run more efficiently. The ice cube ice is potable; and both the ice cubes and the bottles and tubs can serve as freezey packs if the electric goes and I need to empty the fridge into a couple of coolers.

  • I did my shopping way in advance. Luckily, I came to a stopping point in my work that day and could do it late in the morning. But if I'd been slammed with work all day long, I would have gone in the evening. I wanted to avoid the stress of dealing with nervous crowds and empty shelves.

  • Today, we're doing dishes by hand as we dirty them; we've plugged in all our devices (phones, laptop computers, other gadgets); and I'm knocking out this blog post before the Internet cuts out.

    And finally, I've banked up a blog post about home canning apple butter, which should publish tomorrow whether my power is out or not. Take care, and I'll see you on the flip side!
  • 27 October 2012

    Awaiting the "Frankenstorm"

    How are we doing for storm preparation, readers? Here's the National Hurricane Center's prediction as of time of writing, early afternoon on Friday 26 October:

    So Philadelphia will likely be hit late Monday, early Tuesday

    The prediction, as I understand it, is that the hurricane, which is pretty large and so has a lot of energy in it, will hit a nor'easter when it gets far enough north, creating "perfect storm" conditions on a possibly unprecedented scale.

    I was writing a lot about this kind of thing back in August. Was anything I wrote helpful? I think the only thing I would add at this point is that a person shouldn't watch too much TV and shouldn't keep hitting refresh on weather websites. The storm is looking to be bizarrely strong and dangerous, but the hype and alarm aren't helpful once one has the basic facts.

    As for preparation here at the Rowhouse Livin' household, we were coincidentally out of eggs on Friday, so I went the supermarket before noon. As I browsed the aisles, I honestly couldn't think of anything else I needed -- my migraine earlier in the month barely affected our pantry supply of easy-prep and ready-to-eat foods, and the only thing I was out of was ground cinnamon.

    And we can't be out of cinnamon as we approach pumpkin pie season!

    So I picked up a couple of oddball imported jams, some jars of two-for-one pesto sauce (excellent calories for cold weather), a few pounds of wheat berries, and a tin of paprika.

    Storms are less dramatic when you're prepared.

    26 October 2012

    Q & A: Storing canning gear

    The Rowhouse Livin' mailbag got the following question:

    Q. How do you store all your canning equipment?

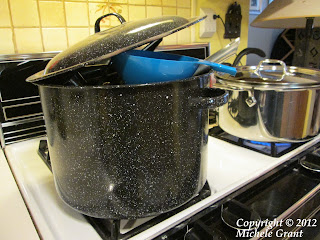
    Many canning tools are "unitaskers" that don't see use outside of canning projects. I'll use the candy thermometer for candy and the food mill for applesauce maybe once a year, and the funnel for filling jars with dry goods, I guess. But most of the time the gear needs to be packed up and moved out of my way. The most convenient way I've found to deal with it all is to pack it into the canner itself:

    I used to have a larger canner

    This is a 7-pint canner. It is a girly canner. I used to have a 7-quart canner, but it was old when I acquired it, and it rusted through. It was late in the season when I went to replace it, and there were only small, girly canners left in the store, so I had to bring home what I had to bring home. While I can easily put up a full batch of pints or half-pints of sweet spread in a canner this size, what I can't do is put up quarts of fruit. Instead, I have to water-bath them in the pressure canner pot, which takes more fuel and more time to heat up than any thin-walled graniteware kettle. Frustrating! My only consolation is that this canner does fit better on my stove than a 7-quart canner would.

    But just about everything fits: canning funnel, jar tongs,
    Foley food mill, candy thermometer

    All in one place. This way, when I start a canning project, I don't have to hunt all over the kitchen and pantry for canning-specific tools.

    As for jars, I mentioned before that I keep them in the boxes they came in. I store packs of new lids on top of those boxes, where I can keep an eye on how many I have. And as for the screw bands:

    Wire coathangers

    I learned this tip from a friend who grew up on a homestead in Alaska. This is only half my stash; I swear I have more screw bands than jars, though I can't fathom why that's the case.

    Do you have a question for the urban home economist? Send us e-mail!

    24 October 2012

    Two key rules for sensible pantry management

    Mormons are counseled to keep on hand enough food and household supplies to last three months or even a full year without returning to the store. "Preppers" sometimes focus just on surviving short-term problems with natural disasters, but they generally dig the one-year rule of thumb, as well.

    So let's fast-forward a little bit and say that you have your food supply stored up, for whatever timeframe works for you. That's great! But there's a potential problem brewing. The food you don't eat is money and effort down the drain. It takes up space, cluttering your home. How do you consume what you've stored before it spoils or loses all nutritional value?

    Rule 1: Eat out of your food storage. Treat your food supply like a convenience store. Every night after cleaning up from dinner, "go shopping" for tomorrow's dinner in the fridge and the pantry. Find something that's nearing its expiration date, or something looking a little wilted, or something you have a crazy surplus of, and plan the menu around that item. Put some beans on to soak. Pick out the spices you feel like using when you cook the beans tomorrow. Are you running low on something? Add it to your grocery list.

    As an aside, note that, depending on how often you go shopping for fresh fruits and vegetables, pantry "shopping" can mean that you may go for a stretch without having a salad or a raw piece of fruit with your meal. Especially in winter, if you don't have a garden. Say you hit the grocery store once a week, on Saturday. Your dark, leafy greens may look pretty gnarly by the next Saturday, so you tend to finish them up early in the week. But what to do by Thursday or Friday when the fridge is getting bare? One thing you can do is start some sprouts on Sunday or Monday. Sprouts from your own seeds, that is, in case your grocery store announces they won't sell them any more.

    The main idea here is that if you don't eat out of your food storage, then you risk throwing out everything you have as it expires. That makes no sense! Your food storage isn't some hermetically sealed warehouse or seed bank that you never touch; it's an economically sound and constantly renewing source of nourishment for your household.

    Rule 2: Don't store what you won't eat. If you don't have the skill, desire, or equipment to make bread and pasta from whole, unprocessed wheat berries, then don't buy sacks of wheat. If you think pineapple is grody, then don't get a flat of cans just because they're a good source of Vitamin C and fiber and you found them on sale cheap. Many resources in print and on the Internet include "helpful" lists of foods to store, and they'll tell you to keep wheat and canned fruit. But don't blindly follow any list you find. Instead, look at your household's dietary practices and build your pantry based on what you eat now and what works for your meal preparations.

    Maybe your household's diet could use some improvement -- most of us would benefit a little change here or there -- but don't waste money building a pantry that you should eat from. Build a pantry that you will eat from. If you don't like or can't use the food in your food storage, then you won't eat out of your food storage. And then you're on the other side of the coin of Rule 1, and you end up wasting the food you acquired because it spoiled before you could steel yourself to choke it down.

    There are plenty of other rules and tips to keep in mind for pantry management. You need to give your storage area a good deep cleaning once per year, for example, and you have to keep it organized so that you know what you have, where you have it, and by what date it needs to be used up. But these are the key rules under which all the other rules and tips fall. Happy prepping!

    23 October 2012

    Q & A: Care and feeding of home canning jars

    The Rowhouse Livin' mailbag got the following question:

    Q. How do you take care of your mason jars after you've used them?

    For all practical purposes, mason jars last indefinitely if you take care of them properly. People on the Internet will tell you that they use 50-year-old jars all the time and haven't broken one yet. Anecdotally, the oldest jars in my own regular canning rotation are nearly 20 years old. Experts caution (PDF) that you shouldn't expect a jar to last more than 13 years. (My guess is that jars that undergo pressure canning year after year get worn out somehow with the stress, and they become more and more prone to thermal shock breakage.) But whether your jars last 50+ years or a mere 13 years, jar care starts as soon as you open them to enjoy whatever it was you last canned.

    When removing food from a jar, use plastic or silicone utensils, or use very great care with your knife or spoon. Your goal is to avoid scoring or scratching the interior surface of the jar, with a mark you may not even be able to see, which can weaken the jar's integrity. A weakened jar can fail in your canner, especially in a pressure canner. And there are few sounds more disheartening than the thock of a jar blowing in the canner.

    Once you've emptied the jar, fill it with water and let it soak for a few hours or overnight. No need for detergent; but be sure not to fill a hot jar with cold water, or vice versa. Then wash by hand with the rest of the dishes and let air dry.

    I prefer not to put canning jars in the dishwasher, because I read somewhere that dishwasher detergent is bad for jars. Additionally, I prefer to really reach my (freakishly small) hand in the jar to feel for residue, and carefully visually inspect the jar after rinsing.

    Remove limescale hard water deposits from jars by swishing some white vinegar inside and out, and then rinse with plain water.

    Set the clean, dry jar upside down in your storage area. I've kept the cardboard boxes in which I purchased my jars, and use them to corral the jars in one section of my pantry cabinet. If cardboard is problematic for you -- for example, if your storage area is damp or you risk an insect or mouse problem -- then find some large, plastic storage totes. To avoid scratches and breakage, line the bottom of a tote with an old, clean towel; and place another towel between layers of jars if the tote is deep enough for you to stack the jars. Don't forget the lid! Finally, keep your boxes or totes in an area that's easily accessible. Make it so that it takes just a few seconds to carry a clean jar to the storage area, put the jar away, and close the box or tote. This way, home canning becomes an everyday part of your pantry strategy and housekeeping practice, not a tiresome chore that involves trekking to the attic or a dark corner of the basement.

    In the end, the better you clean and store your jars, the less work you'll have to do when you take them out for use next canning season. Most manuals and web pages will tell you to wash the jars in hot, soapy water immediately prior to using them again -- but why? They were clean when you put them away! Unless you find evidence that mice got into your jars, just rinse them and heat them in the canner. (If you do find mouse issues, then by all means wash the jars, soak them in a bleach solution, and then rinse with plain water before using again.) So long as you process your food for at least 10 minutes, you don't need to pre-sterilize the jars.

    Do you have a question for the urban home economist? Send us e-mail!

    19 October 2012

    Changing seasons, changing linens and clothes (Part 2 of 2)

    A few more tasks to get through, and then we're good to go . . . until spring, when we'll change everything back for summer. (See Part 1 here.)

  • Literally rotate clothes and linens from back to front. Set aside a block of time to empty your dressers and closets completely, move summer things to the back, and move winter things to the front. In the process, check for linen moths. If you find moths, deal with them immediately. Discard (do NOT donate) unsalvageable items by tying them up in the trash and putting them outdoors; clean, treat, and mend the items you can keep; and vacuum the closet and furniture (PDF). After you've vacuumed, put cleaned clothes away (PDF). Finally, try to remember if you acquired any of the moth-infested items at a second-hand shop. If so, consider never shopping at that particular store again, or at least quarantining and prophylactically dry-cleaning items you buy from that shop in the future.

    In the coat closet here at Rowhouse Livin', this means moving my summer hats to a higher shelf and bringing down my winter caps, scarves, and gloves. Plural, because I'm a cold-blooded person, in more than one sense of the word. This year, I found a hole in an upscale name-brand knit hat, one in a color that's still fashionable this year, and knit in a toasty-warm and soft cashmere and wool. "Curses!" I said when I found it -- until I remembered that I'd literally picked the hat up off the sidewalk a block from my home last year, around midnight when the street was deserted. Hey, free hat! So one of my mending tasks this year is to kludge some kind of repair, likely involving a crocheted flower or star over the hole, and hopefully something that's not Regretsy-worthy.

  • Check your shoes, too. Empty out your shoes' storage area and clean it. Clean, brush, and polish the shoes. Deodorize, if needed, using one or more of the following methods: (1) Leave them out in the sun or in a very sunny window for a full day; (2) Spray the interior of the shoes with 91% rubbing alcohol, which will kill viruses and bacteria; (3) Spray the interior of the shoes with white distilled vinegar, and leave them in the sun; (4) Fill old socks loosely with baking soda, place the socks into the shoes, and literally bake the shoes at your oven's lowest setting for a few hours -- but do this last one at your own risk of melting cheap shoes. After treating the shoes and letting them dry completely, stuff them with paper and store them away. Whether put in their original boxes, or in a home organizing solution, or simply off to the side of the closet, the shoes should be stored so that they won't get dusty over the next several months or get marred by muddy, salty winter shoes stored near them.

  • Plus bags and other accessories. If you use different handbags, backpacks, or totes from one season to the next, now is the time to check them out, too. (For example, one handbag I love to use is made of lightweight, light-colored canvas and has flip-flops embroidered on it. I could be ironic and use it in February, but of course I only ever take it out when it's sunny and warm. It coordinates with a sundress and sandals, not a parka and snow boots.) Empty the bags out -- really look to make sure there isn't a lonely granola bar down in a hidden pocket, or cash, or some paperwork or anything you've forgotten. Launder them, if you can, or take them for professional leather cleaning and repair, if brushing them off or wiping them down won't get them clean enough.

    Hats: Since of course you wear a broad-brimmed hat in the summer, you'll need to move these to the back of your closet now, too. Launder, or clean gently by wiping, or rinse and re-block, depending on the type of hat. Most baseball caps will have washing instructions sewn in. Very importantly, let everything dry completely before putting it away, or you risk creating a mold problem in the closet. And mold is much, much easier to prevent than to eliminate.

    And now you're done. Your clothes and linens are switched out for the season and you're set until warm weather returns. Did I leave anything out?
  • 18 October 2012

    Changing seasons, changing linens and clothes (Part 1 of 2)

    So the frost is on the pumpkin and it's time to dig the blankets and sweaters out of storage and put our summer linens and clothes away until spring rolls around again. It's a good time to clear out unstylish clothes; items that are irretrievably damaged; and things you just won't use again.

    I'll list a number of tasks here. Maybe it's a lot of tasks. Maybe it's too many, and I'm looney-tunes for doing all of these things every six months. But you don't have to do all of them in one day, or even one week. I'm not even putting them all in one post. And it's most onerous the first time you do it: the work you put in now pays off in time and in your budget later on. Here goes!

  • Change the bed linens, whether they need it or not. Replace with "winter" linens, and put the summer-weight linens in the laundry. Do this item first, so that at the end of the day, when you don't feel like moving any further down this list, you'll have a freshly made bed to fall into.

  • Go through the closet and dresser and evaluate your summer clothes for cleanliness. Launder everything that was just airing out. For example, I keep a couple of loose-fitting, long-sleeved shirts to wear as toppers over tank tops, to keep my arms from tanning unevenly. I'm vain. But these shirts don't get terribly sweaty or dirty after a single wearing, so I leave them on a hanger outside of the closet for a day or so before putting them away. They get laundered maybe once every two weeks. But the last time I put them in the closet, were they laundered first? If I have any doubt, I launder them in this last-of-summer batch. If they go away less than perfectly fresh, they'll impart a stale odor to everything else in the closet and attract linen moths.

  • Evaluate your summer clothes for mending needs. I hate fixing buttons and repairing seams, and I know you do, too. So I make it a twice-per-year chore (with emergency sessions during the year as needed) to haul out the sewing machine and do some needed repairs. Put on a movie, serve up a tasty beverage, and get to work. Or go to the tailor's and stop by a bar on the way home for a tasty beverage and a ball game. Either way, you'll thank yourself next spring when you pull these clothes out of the closet with joy at the return of warm weather, and you don't have to toss something aside because of a missing button.

  • Evaluate your summer clothes for "I never wear this any more." Be honest, and be tough. Is there anything among your summer clothes that you never wore, all summer long? (Not sure? Here's a trick I think I saw on Lifehacker: At the beginning of the season, hang your clothes backward in the closet, with the point of the hanger facing out instead of in. After you've taken it out and worn it, replace it in the closet with the hanger facing in, the correct way. At the end of the season, anything with the hanger still facing out wasn't worn. Proceed to the next step.) Then get rid of it! Don't wait until you lose weight, or that style comes around again, or you get around to having a tag sale, or whatever. Just hand the item down to a friend or donate it to charity. If it's super shabby, call your charity and ask if they take unsaleable items anyway. Locally, Philadelphia AIDS Thrift re-sells raggedy clothes as "weight": cloth by the pound that is recycled into carpet padding or put to other industrial uses. But please call your charity first to see if they do this; donated trash is no donation.

  • Evaluate your summer and winter clothes for "What do I need?" Make a list. Right now is an excellent time to buy summer clothing at end-of-season closeout prices, and to find the best pickin's of winter clothing at thrift stores, where they are often rolling out their cold-weather stock for the first time since last winter.

    More tomorrow!
  • 17 October 2012

    Clothes used to be more sturdy

    I'm feeling a little "get offa my lawn" today about clothing. It seems to me that clothes were made a lot more sturdy when I was growing up, when shoes were shoes, sneakers were for gym class, and girls weren't allowed to wear trousers to school. As if manufacturers knew that older siblings would hand their clothes down to younger siblings, seams were taped, sweaters were fully fashioned, and dresses were always lined.

    Via my lawyering colleague Leo, an article in the NYT recently discussed why you should buy better, and buy less often.

    I'm working on a post for later this week about how to change out the household's wardrobes and linens for the change of season. (I had to bring out a wool blanket for my bed last week.) One task is mending -- and I really think I have more mending to do with new clothes than with older ones.

    16 October 2012

    A sick day: Was I ready?

    I spent all day yesterday down for the count with a migraine after a midnight bout of food poisoning. But other than the debilitating, immobilizing headache that kept me on the sofa with the lights turned off and the radio turned down low (and, oddly, all the music sounding off-key), I did OK. Why? Because I have a fat store of instant and easy-to-prepare foods stocked up for just these types of situations.

    Rowhouse Livin' is a one-adult household. That is, when I get sick, unless it's the weekend I don't have an adult partner who can stay with me and telecommute while I lie on the sofa and moan, "Oh, mercy," pathetically all day long. So one of my preparation strategies is to make sure that I can take care of myself out of my pantry when I'm too ill to make it to the grocery store. And I aim high: I try to keep a good two weeks' worth of food on hand. When, as yesterday, I'm knocked out of commission for 24 hours, I have a very good selection of items to choose from to nourish myself with calories and electrolytes while avoiding, if I need to, migraine triggers.

    Don't get me wrong. I didn't eat particularly well. What I cobbled together to sustain me for the day isn't something I like to feed myself or my daughter on a regular basis. An instant noodle bowl, a granola bar, watery oatmeal with a couple of prunes, yogurt with a swirl of cherry jam, a couple of slices of bread, a ginger beer, and finally a sandwich at the end of the day. For me, that's a little heavy on the sodium and sugar, with little protein and no fresh produce, and it didn't offer very many calories at all. But not too bad for a day when I had to gather my strength and courage for a good 15 minutes before I could even lift myself off the sofa in the first place.

    We also had some simple dinner fixin's on hand so that my daughter could cook herself up a pan of pasta and red sauce while I lay on the sofa and moaned, "Oh, mercy," after she came home from school. Life was a little rougher before she was a teenager.

    What do you keep on hand to help yourself through sick days?

    10 October 2012

    As canning season wraps up, a check-in

    Canning season is wrapping up. I can tell, because I'm almost out of jars. I have just a handful of quart jars left (I've never used so many before this year! A new record for me), and I've reserved only enough pint jars for one good batch of apple butter, which is a pantry staple the Rowhouse Livin' household can't do without.

    Part of the calculations here is that I have two dozen each of the common sizes of canning jars: half-pints, pints, and quarts. I have another dozen of 12-oz. jars, a size between pints and half-pints. But I don't like to use them because they're apt to topple over in the canner, and I risk a seal failure when a jar falls onto its side the way these clumsy jars do. Finally, I have another half-dozen half-pint jars for canning, and about a dozen antique quart and pint-and-a-half jars I use solely for dry storage because I don't know how reliably they'd survive the canner due to their age and questionable provenance.

    I'm undecided about getting more jars. On the one hand, putting up food and eating from my pantry is a helpful economic strategy for the household. On the other hand, the household is crammed into just under 1,000 square feet. That's not a lot of room to store too many more than the 100 or so jars that I have, at least not with the storage system I have.

    And oh, my storage system! My main tool is a piece of furniture I was fortunate to keep after my divorce: an 81-inch-tall pine cabinet we found used, at a garage sale in West Seattle sometime in the 1990s for a fraction of its original price. And by fraction, I mean like 1/6, because we got for about $125 what the sellers probably bought for about $800 new from a craftsperson.

    I don't mean to brag. It's rude. We were very lucky to find this cabinet -- and I'm very lucky to keep it, because my home, built in the early 1980s and likely planned for childless yuppies, doesn't feature the kind of closet pantry that builders have been designing into many newer homes. The cabinet can easily hold all of my jars, canned or uncanned, with room to spare for a dozen boxes of pasta, six bottles of wine, 10 cans of generic spaghetti-o's and condensed tomato soup, and enough martini fixin's to get us through the worst of a mid-Atlantic blizzard. I could install some heavy-duty, jar-capable shelving over in the laundry nook behind the galley kitchen, I suppose. But I'm not sure that I truly need more storage space for the Rowhouse Livin' pantry strategy of having enough on hand for two weeks of not getting to the grocery store.

    Anyway, my point, and I had one when I started, is that the end of canning season is bittersweet. I didn't put up any raspberry jam this year, which is far and away my favorite sweet spread. But I did use my pressure canner more than ever before, which stocks the pantry with "real food," you know, for actual meals, as opposed to condiments and preserves.

    Canning is such a satisfying hobby.

    How are your winter food preparations coming along?

    09 October 2012

    Canning winter squash the USDA way

    I've been a little horrified by some of the YouTube videos and blog entries posted by home canners and "preppers" who I'm sure are very well-meaning, skilled, and as yet not dead from botulism. I'm no nutrition expert; my kitchen sure isn't a food laboratory; and really, Jim, I'm a lawyer, not a microbiologist -- so what do I know about safe home canning practices?

    As it turns out, I do know a lot about home canning. I've been canning for at least 15 years. But since I'm not a microbiologist, and since my kitchen isn't food laboratory, and since I'm not a nutrition expert, I rely on other experts to put home canning practices and recipes through scientific testing under controlled laboratory conditions. I'm thrilled that the USDA and various land-grant university extension services do that work for me, and I'm happy to use their results.

    Last week I discussed that a home canning blogger offered a good looking but problematic guide to putting up winter squash. This vegetable is particularly tricky to can at home because its water content and texture can vary so much. In order to make sure the home canning process thoroughly kills the bacterial spores that produce the deadly botulinum toxin in this uneven vegetable, you're supposed to make sure that you: (1) pack the jars with heated one-inch cubes of squash, never purée; and (2) process the jars in a pressure canner, pints for 55 minutes and quarts for 90 minutes.

    I don't know why some of these Internet home canners don't follow these two rules. (At the link above, for example, they canned purée and processed the quart jars for under 90 minutes.) If the issue is that they prefer purée to cubes, home-canned cubes are simple enough to mash or purée when the jar is opened. If it's an issue of processing time, well, I think there's little difference between 75, 80, or the USDA-recommended 90 minutes. An extra 15 minutes of stove fuel will do very little harm to my utility budget, but an under-processed jar of food can make my household very ill.

    You know what else I see on some of these Internet home canners' websites and videos? Messy kitchens. Messy both in clutter and in dirt. Again, I don't have a sterile laboratory of a kitchen myself. But I clear off my workspaces, lay out all my tools ahead of time in an almost complete mise en place, and clean my utensils and dispose of waste as I go with a canning project. And I keep my fingernails short. Who are these people with manicures? Do they really want that acrylic, varnish, and adhesive getting into the jars? Ew.

    But on to the Rowhouse Livin' project. We canned six average sized butternut squash. As always, if you are not familiar with home canning, please see the National Center for Home Food Preservation. This blog entry does not substitute for a complete set of instructionson safe home canning practices. A full guide for canning is especially important where, as here, we're talking pressure canning. This food item CANNOT be safely canned in a boiling water bath canner. More!

    08 October 2012

    Columbus Day blogging

    Rowhouse Livin' is marking Columbus Day by pressure canning some winter squash. (Step 1: Put some of yesterday's soup in the slow cooker so that it's nice and hot for lunch.) Photos tomorrow!

    05 October 2012

    Rowhouse Livin' gin

    Rhubarb seems to be a trend lately among farmers market aficionados, chefs who want to feature seasonal ingredients, and hipsters and homesteaders getting into old-timey recipes. Who can blame them? I grew up on my own grandma's rhubarb pie -- not strawberry-rhubarb, just straight rhubarb -- made from the patch growing by her front stoop, and it helped make me who I am today: sour, stringy as I get older, and a good source of Vitamin C. Not that this makes our household more authentic than someone who first tried rhubarb in the past few years. But let's just say that some five years ago I was thrilled to have found some rhubarb at the Whole Foods, and when I gleefully tossed it onto the conveyor belt at the checkout, the young cashier with 1980's-style glasses and her half-shaved hair said, "OK, I give up. What's this?" And I desperately wanted to answer her, "Oh, it's something I've been eating for decades, but you've probably never heard of it."

    A local purveyor sells a rhubarb-infused spirit. It's too sweet for my taste, and it's too expensive for my wallet. (And it's not exactly local any more.) Here's the Rowhouse Livin' version.

    Clean and roughly chop enough rhubarb to fit loosely into four one-quart mason jars. Cover completely with a mid- or low-priced, unflavored vodka. (I use Jacquin's, local to Philadelphia.) Close the jars with two-piece caps. Let the jars sit in a dark corner, away from heat, for at least six weeks. Check the jars for evaporation and top off with vodka if necessary, though this is unlikely. Gently shake the jars three or four times during the six weeks.

    Prepare your storage bottles by washing them in hot, soapy water. Rinse in hot water, and then purge out the water droplets by rinsing with a jigger of plain vodka, much as you'd do in a chemistry lab with your glassware, except with grain spirit instead of lab-grade ethanol or acetone.

    Strain the infusion through a colander or strainer, squeezing or pressing the rhubarb; and then let pass through a coffee filter, changing filters as they get clogged. Store indefinitely in tightly closed, food-safe decorative bottles:

    We'll use the jar first, and the whole stash will last
    about three years

    Because it's unsweetened, a less hardy urban home economist may want to keep some simple syrup on hand. Without sweetener, over ice with a splash of water it's refreshing in the summer and bracing in the winter. Bottoms up!

    04 October 2012

    Applying CRITIC to a home canning blogger

    Your tax dollars at work, and I don't mean that sarcastically at all: I've found an excellent slideshow webinar from just last year (2011) about home canning. The speaker, Elizabeth Andress, Ph.D., of the University of Georgia Cooperative Extension spends a nice amount of time discussing how improperly canned food promotes the production of the botulinum toxin by C. botulinum, and then she moves on to nuts and bolts. Useful introduction for anyone who's never canned before, and a nice review for old-timers like me.

    She wraps up the webinar by suggesting that home canners pick up a few publications from the USDA and read very carefully the booklets that come with their canning supplies. Here's where CRITIC can come into play. I still have a bee in my bonnet about putting up some winter squash before the end of the month. I'd love to purée it so that I can fit more squash in each jar and thus use my pantry space efficiently. But word from the USDA and my canning supply booklets says that's a big no-no, and I should can the winter squash in cubes instead. On the other hand, look at this lovely blog entry about canning squash -- against all bold-faced warnings based on laboratory testing, the blog author purées the squash. Then, contrary to specific instructions accompanying tested methods, the author leaves only a half-inch of headspace. But the jars look fine, and the author has evidently not perished, because they have continued to blog since posting their photos. And they sure do look like they know what they're doing.

    The problem is that repeated laboratory testing -- laboratories, where they have instruments to digitally measure pH, temperature, air pressure, density, and so on, unlike what I can see in the blog author's kitchen -- has found no way to formulate a consistently safe recipe for home canning a winter squash purée, even if you add lemon juice to try to increase its acidity. This is because the chemical composition and texture of winter squash vary too much from item to item and in preparation of the food. By the time you've cooked the squash and mashed it, one batch will be watery and another, well, not so watery; and without commercial canning equipment you can't tell whether you need 60 minutes at 240 degrees F or 120 minutes. It makes for way too much variation to boil down, so to speak, for home canning instruction. (Do you have an evaporator at home?) In other words, the USDA would argue, you can't magically make pumpkin an acid food, that is, a substance that can't promote growth of C. botulinum bacteria, by adding lemon juice and sugar and cooking it into pumpkin butter. Apple butter is fine, because it starts with fruit, an acid food. But pumpkin butter starts with pumpkin, a low-acid vegetable. You can't get around that.

    Happily, the word has generally gotten out that home canners should preserve winter squash in chunks, not puréed. The chunks are easily mashed before use, anyway.

    Whom to believe? The home canner with their photos and nice blog, or the USDA? Call me a "sheeple" but I'll go with the USDA. Two prongs of the CRITIC test fall in the USDA's favor: the first I and the second C.

    The claim: USDA says that home pressure canning winter squash must be done in cubes, never in purée. Home canning blogger offers method for preserving purée for purportedly safe household use.

    I - What is the information supporting the claim? The USDA labs are constantly trying recommended home canning recipes, adjusting instructions, and even sometimes withdrawing suggested methods when new data emerges. The home canning blogger has their blog and some photos. There is no follow-up blog entry (that I saw immediately) as to whether the purée canned successfully. But the USDA releases new editions of its canning guidelines frequently.

    C - What cause is proposed for the claim? The USDA gives detailed reasons in its page advising against canning winter squash purée, e.g., that they tested commercially produced and home-canned pumpkin butters that had pH levels too high to inhibit growth of C. botulinum bacteria. The home canning blogger gives . . . nothing. There is a processing time given, but no reference to an authority, not even Grandma, for this amount of time, which is 10 minutes less than the USDA's scientifically tested time. The blogger doesn't address this discrepancy, and they don't address why they, in opposition to canning guides published by university extension offices around the country, believe that canning purée rather than cubes is safe. In short, the USDA explains its cause, but the home canning blogger offers no cause at all.

    CRITIC says that I should listen to the USDA, not an Internet blogger, even though their photos make their step-by-step instructions mostly helpful. Except for that half-inch headspace thing. It should be a full one inch.

    03 October 2012

    The CRITIC method for evaluating the Internet

    The other day I came across a profile of Wayne Bartz, a professor of psychology who has offered the acronym CRITIC for undergraduates to use as a method to evaluate stuff they read. In brief:

    C Claim? (What is the claim?)
    R Role of the claimant? (Who is the claimant? Where are they from, and cui bono?)
    I Information supporting the claim? (Does the claimant offer anecdotal evidence, or results of a peer-reviewed inquiry following the scientific method of evaluating empirical findings, or something in between?)
    T Testable? (Can the claim be tested?)
    I Independently repeated? (Has anyone else re-tested the claims and repeated the claimant's results?)
    C Cause proposed? (What kind of mechanism does the claimant offer that causes the claim to occur -- is it something reasonable, or is it something that flies in the face of current scientific understanding?)

    The full article (PDF) discusses the CRITIC steps from the perspective of teaching it to first-year college students. I think it's useful for evaluating blogs, informational websites, and YouTube videos offering information that an urban home economist may use. For Rowhouse Livin', purposes, we've been all about food preservation lately, as the farmers market season wraps up. For example, for my next trick I'll be pressure-canning some winter squash some forthcoming weekend. I figure it'll be nice to have on hand some quart portions of pre-cooked chunks of squash for quick soups and side dishes as the school year progresses. Some school nights we don't roll in until after 7:00 p.m., and if I don't have dinner on the table within about a half hour of coming home, I feel like a bad mom. Or very hungry, anyway. So we've been looking up and trying to evaluate canning recipes and methods. But what to do when a recipe says, "I've been water-bath canning my pumpkin puree for 50 years and haven't killed anyone yet," or a video shows someone inverting jars after taking them out of the canner? Run the suggestions through CRITIC.

    I still have a few questions about canning winter squash. It's supposed to be a good source of Vitamin A, but how well does Vitamin A hold up to canning? I've wasted time, money, and jar lids if the squash loses all its nutritional value in processing. (Approximate answer is "go ahead and can it," from a source that home economists should bookmark)? I've found a helpful home video, but after he removes the canner lid, shouldn't the dude in the video let the jars sit in the pressure canner and cool a little bit more before removing them (not necessarily, but I do)?

    I think I have a good handle on what I need to know for the project, but I'll poke around a few more resources before I get started. What kind of critical thinking checklist do you go through when you look on the Internet for answers to a question?

    02 October 2012

    Home canning so far this year

    Light blogging today while I get some other work done, so a quick summary of my home canning so far this year:

    • 4 half-pints of strawberry jam
    • 2 pints of rhubarb jam
    • 5 half-pints of strawberry-rhubarb jam
    • 1 3/4 quarts of "Rowhouse Livin' Gin" (a rhubarb-infused vodka)
    • 4 pints of onion pickle
    • 6 half-pints of blueberry jam
    • 2 quarts of brandied blueberries
    • 4 quarts of tomatoes
    • 4 pints of marmalade and 1 pint of marmalade syrup
    • 2 quarts of vegetable stock

    About the only thing left to do this year is some apple butter. I usually make two batches, but we'll see what my weekends look like for the rest of the month. Also I'd like to put up some more vegetable broth, because it was a straightforward project.

    Have you put anything up this year? Any plans for the rest of the season?

    01 October 2012

    Home canning: vegetarian soup stock

    Last week I canned two quarts of vegetarian soup broth. Usually I'm happy to use store-bought soup concentrates, but it's good to have on hand something that doesn't require added water to use, and in a real pinch doesn't even need to be heated up. Just a bottle opener and we're ready to go. To begin:


    Math and more photos after the jump . . .